Tuesday, May 14, 2013

First race


Getting there is half the fun

On Wednesday I found out that PPSCC was having an autocross on Saturday so I decided why not and started making plans.  I was originally going to buy a car dolly to tow the Miata but after calling all the ads on CL only one wasn't already sold.  On Friday after work I checked it out and found out there was a good reason that dolly hadn't sold, it was scary.   So I had to figure out another plan.  I checked recargo and there was a Level 2 at a Walgreens a couple miles away from the event. With a Level 2 it would only take me an hour to top of my pack but it was easier to leave it overnight. We called the store and they said it would be no problem leaving it to charge overnight. The week before I had just happened to order the parts for a J1772 charge port so at 7pm I wired it up and drove it down. 

Apparently things were going to smoothly because just a few miles down the road a deer jumped into the road in front of me. Luckily I was only driving about 35mph and just pushed the deer forward a foot and it ran off.  Because the speed was low the damage was light limited and after a quick check I continued driving to the charge station.  However when I went to charge I found that the charger wasn't working with my port.


I later figured out that it wasn't liking my non-isolated PFC-20 and tripping the GFCI.  There was no 110V plug on the charger but down the road were some more chargers and went to try them. Keeping in the theme for the night they were wired up but not activated yet.  Luckily my wonderful wife spotted a 110V outlet on a nearby light pole 30' away from those level 2s was.  Great!


But I had left my 110 plug on my workbench a 30 minute drive back! D'oh!  At this point common sense would have been to give up and call it a night but a quick run into Walgreen's along with a few minutes turned a power-strip, wire nuts, and some electric tape into a ad-hoc charge chord and left the car to charge overnight and we finally got to bed shortly after midnight.

Track time!
The next morning was time for some racing!  The car passed through tech and got a lot of questions from fellow racers. 


There were a lot of nice fast cars out there Focus ST, FR-S, 370z, '13 Boss 302, several Miatas ranging from stock to turbos and race prepped full caged, and in general a lot of cool mustangs since PPSCC did the event in conjunction with the local mustang club.


Everyone was really nice but unfortunately my co-driver wasn’t allowed.


 The autocross was a fun set-up with a nice high speed chicane and made a U-turn with a broken sweeping 270 that was a lot of fun to steer through with the right foot.  :)  Unfortunately my mount for my camera wasn’t stiff enough to handle the g forces so no in car video but I am going to have a GoPro silver for next weekend’s race at PPIR.


I have to say that my favorite part of driving the car is the throttle control.  If I came in too hot to a corner I could *save* it by hitting the gas and bringing the rear of the car around.  The Soliton1 and the 9” motor just delivered exactly the torque I wanted, whenever I asked for it.  I am actually toying with the idea that my next project will be an electric drift car.


I have to say that I am not a great driver. I haven’t raced in 6 years and I was a slow driver way back then. Each lap I remembered how to drive and dropped almost a second each time around.  I felt the car could have gone a lot faster but turns out the car was doing very well.


I am running the Soliton1 aircooled and it worked wonderfully.  Starting in second gear the initial launch is a little off compared to what is best described as the feeling of thrust once it’s rolling. Looking at the logger I am being limited by the slew rate at launch for the second quarter of a second.  I tired bumping it to 3000 but I need to do some more tweaking (mostly of the driver) and testing to get a good launch.   I do want to get some more weight on the rear wheels.  I am going to move the charger to the back and try to get my 4th module back together and installed.


I was busy driving and working corners but my wife said when they posted the times everyone on the side lines were saying "I can't believe how fast that electric Miata is, it beat most of the cars out here." which made my day even better.  Looking at the results out of the 44 racers 4 of them solidly beat my best time including an awesome sounding red mustang, a race rX7, a black mustang, and new 370z getting times of 42.5-44.5.  I was within a few tenths of another 5 racers as it ended up that a bunch of us managed times right around 45.5.  An overall 9th out of 44 was far better then I was thinking I was going to manage.   Even more surprising was beating a new Boss 302, Focus ST and FR-S, which are some sweet cars.  And that was with me behind the wheel and 70% power.  For the next event I am going to bump the power from 800 to 1000 amps and move the voltage up to 155V to give me more pull off the line and a tiny bit better top end.

Working corners my favorite two cars to watch were a really cool tuned up orange focus hatch and that fast red mustang with the white stripes.  Both sounded awesome.  I need to put some open headers on my 9” motor.J Needless to say I was really happy with the car's performance and really appreciative to PPSCC for putting on the event and everyone who showed up.  

Wednesday, May 8, 2013

Spring cleanup

This weekend between me, my son and a buddy I was able to wrap up some more big items to get the car track ready:


I found the original RR strut was blown after sitting all winter so decided it was time for those used KYBs I bought in the fall but then I found one had a dented tube, after I installed it L. So I ordered a new one and put it in


The KYBs seem pretty good.  I am still sitting higher in the rear then I would like.  I will eventually redo it all with a set of FM V-Maxx Classic coil overs http://www.flyinmiata.com/index.php?stocknumber=13-16210%20%201990-97%20NB) because I can really dial in the ride height.  I plan to move the charger to the rear and some more batteries in back too which will help but for now it’s fine.


I also replaced the pads with some hawks and flushed the brakes with ATE SuperBlue.  Now the brakes are really nice.


I also finished securing the battery packs and putting covers on the terminals
.
Since this weekend the snow was gone and the weather was perfect I got the car out and started doing some real pulls, getting some data, and slowly upping the current and voltage.  I live out in the sticks so it’s pretty easy to find a straight stretch of road with no traffic that I can do 0-60 times.  So far the controller has been set to at 500 amps and 120V but after a hour or two of driving and reviewing the data logs I went up to 150V and 800amps on the motor. Now the cars is fun! :) The best part was strapping the car seat in and taking my 5 year old son for a spin.


 I am holding off going to the full 1000a and 160V to keep the pack limited to 12C. At 12C and only 30% SOC the back sags about 15% which is on par with a CA series CALB.  I still have one of the modules out of the car with the bad cells.  Once/if I put them back in then I’ll try going to 1000a.
I got my boss frog double hoop Maxx roll bar and they take their packing and shipping seriously.


I like the look of the double hoop but I HAD to have something that was a real piece of safety equipment, otherwise there was no point.  This car is going on the track and boss frog is the only one that is SCCA and FIA. http://www.bossfrog.biz/Miata_Rollbars.html


The installation was pretty straight forward and only took about 4 hours.


Monday, December 24, 2012

Stage 1 complete!

Well today we got the Miata titled as a EV and plated!  The first stage of this project was to to convert the car to a street legal EV and that is now complete.  As with all projects like this there are little things that will be done (like the brake lights stopped working) but getting it titled and registered is a big step.


Look ma, no exhaust!

For people registering a EV conversion is Colorado it is actually very easy, depending on who you ask.  :)  Do not take it to a emission center.  They will tell you that you need to get a bunch of extra paperwork and inspections as if it were a kit car.  Don't go down this road (pun intended).  Instead call your local motor vehicle registration. All you really need is a VIN inspection which is easy and cheap ($8).


We talked to the nice people (no sarcasm intended) at the Douglas County MVR and they told us that Douglas county even does onsite inspections!  We called the number they gave us and sure enough an hour later a officer showed up and did the VIN inspection in my garage!  For the conversion all the officer does is puts on the form that it is a title correction.  He does the VIN check like normal but he just puts a E in for fuel type.  Take that down the MVR and you get your plates a EV title will be mailed to you.

What's next?  Well I am trying to decide on if I will do stage 2 and go dual motor with direct drive.  I have a Brand new Transwarp9 on the bench ready to go but I don't know that I have the battery pack to make it worth while.  My options would be but more A123 cells to pump the voltage from 184VDC to 307VDC or redo the whole pack in some CALB CA70's.  Neither of which are particularly appealing. In the mean time I will be upgrading the suspension, adding a roll bar doing some body work this winter too.


I set a goal for myself to do one conversion a year.  I think my conversion for 2012 will be a plug in hybrid.
I have a 2005 GMC Canyon Crew Cab 4x4 with the 4 cylinder with the a 5 speed manual transmission which I am going to be adding a 108V LiFePO4 pack a Curtis 550amp controller and a AC24LS motor.

This winter I will be experimenting with AC using the AC24LS motors which I am documenting on another blog:

http://evengineering.blogspot.com/

Merry Christmas!

Saturday, November 24, 2012

How to make a cool charge cap for $60


I wanted to share the charge port I put on my Miata.  Most conversion use the place for the gas filler.  


While this works well I didn't want that for my conversion because I wanted to have my charge port to be mounted up front instead of the back.  I wanted this for a couple reasons:


1st: is because I was mounting my charger up front and didn't want to run the 220V wiring from back to front

2nd: I wanted the charge port in my line of sight to prevent the possibility of driving away while plugged in (there are electronic safeties too)

3rd: This is just cooler

The standard NEMA L14-30 works fine but will collect debris, water, snow, etc and leaves a lot do be desire aesthetically. 


So I looked for a housing that would protect the connector and dress it up.  After much searching for caps that were either too small or too expensive.  Then I came across 1967-68 Barracuda 1967 GTX 1968 Charger Flip Top Fuel Cap.  I picked a used one up for $40 that was in great shape but new reproductions run around $100.  You can also get one for the charger which should work too (I don't care for the looks

When I got the cap I was pleasantly surprised to find that the outlet fit perfectly inside the cap!


I only had to do a little trimming for the hinge and drilled one hole in the plug housing and it was ready to install. 


I potted the plug into the cap with some black silicone to make it weather tight and make a cleaner looking install.  The nice spring loaded rubber seal that the cap has to keep the gas in does a great job of keeping moisture out.  So for $60 I had a cool looking cap.


I had mounted in the hood I need to make provisions for the hood moving so a spring was added to keep it from binding.

Tuesday, November 20, 2012

2 month inspection of A123 cells


I wanted to give a update on my A123 module after a few months.  There is good news and bad news.  The bad news is that I have more bad cells, the good news is that there is a pattern to the failures.  I have 4 modules in my car, 3 are the original Mark 1 design and the 4th is the Mark II with the much stiffer endplates.  I did a pretty detailed inspection of all the cells.  The pattern to the failures is cell pressure, either too much in the case of module 2 or uneven pressure at the thin end plates for all of the early Mark I designs.


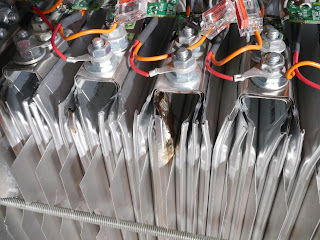
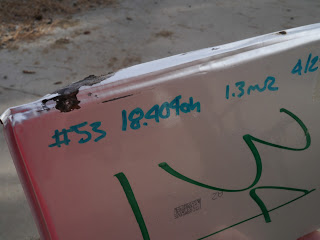
Module 1, Mark I, RevA: 1 cell had signs of electrolyte leakage and 1 other cell had a little spot that looks like mold.

This spot is the start of corrosion in the pouch.  The two cells were right next to the end plates.  I am upgrading it to Rev B.

Module 2, Mark I, RevA: Numerous cells had signs of electrolyte leakage.  Most of them were on the ends but some in the middle of the pack.  This pack was also problematic last time I inspected it.  My guess is that I over compressed the cells the first time I built it that caused undetectable damage. The second time I assembled it there was much less clamping force but I think the damage was already done.  I am putting this pack aside for now until I have a had a chance to evaluate it further.


Here you can see several cells failed from the pack.  In some the electrolyte is still trapped between the clear outer film and the silver inner layer.


Module 3, Mark I, RevA: 1 cell had signs of electrolyte leakage on one side.  This cell was locate right next to the negative end plates.  Failure looks like it was due to uneven pressure on the cell.  I am upgrading it to Rev B.


Module 4, Mark II, RevB:  I actually had a leaking cell for the first time on the Mark II module.  I didn't discover it until I checked each one separately.  The cause was quite apparent, user error.


When I had installed one of the cooling fins the sharp thin aluminum cut and tore the thin pouch material.  I cannot over emphasize how gentle you need to be with these pouch cells.  This is probably my biggest issue with using these cells. So I replaced the bad cell and also added electrical isolation using transparancies.  I only did half of the pack.  This way I will see the effect, if any.  I also upgraded it to Rev B too.


As with all my other posted I wanted to post what I have found with testing so far.  Hopefully it will save others some headaches if they decide to use the pouch cells, (or in some cases it might convince them it's too much work :-)  I expected using these cells to be a learning experience, but this has been more work expected.  I have spent more time and effort on the batteries then I have on the rest of the conversion but that is part of the fun of the project.  :)

The fallen cells


Sunday, September 30, 2012

Rev A and on to Rev B

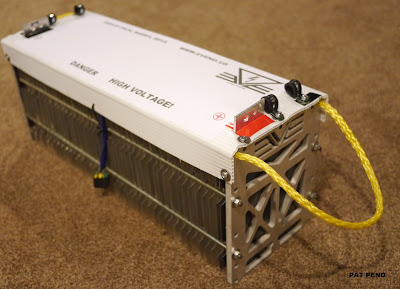
Here are some pictures of the Mark II pack.


I have been having problems with one of my Mark I pack having leaking cells and I think it is due to uneven pressure on the cells.


I pulled the pack and you can see the electrolyte on the cooling fin


I am glad I made the pack easy to remove and replace cells.  This is the third time I have had to R+R bad pouches.


The MkII has very stiff end plates which I think mitigates this problem.  A couple of changes from the Rev - and Rev A design:  I glued plastic plates over the inside of the end plate to prevent possible shorts to the end plates from the tabs.  I also put a sheet of elastic foam between the end plates and the outer most cells.  This foam sheet acts as as spring to control the pressure on the cells due temperature, cycling, etc. and insultation on the threaded rod to prevent a electrical pat from the fins that may be touching the rods.

I am considering adding insulation in between the cells.  I haven't had a problem with it but others have:

http://www.diyelectriccar.com/forums/showthread.php/a123s-gone-bad-78971.html

The factory modules don't have any intracell insulation but obvious some people are having problems.  I have to do some more head sratching as to what the root cause of the problem is first.

Friday, September 21, 2012

Keeping cool


Still not home yet but a couple hour layover is as good as time as any to update the blog.  I have had a few people ask me about the cooling fins on the pack so I am posting so more info.  

I know there is much debate whether thermal management is required for these batteries.  Some say it is not required while others say it is essential for battery life.   In reality they are both correct.   If you are taking a leisurely cruise on a spring day then thermal management will not be a problem for you.  The starting temperature of the pack and the low discharge rates don’t require it.  However if you are driving in more extreme conditions or operating your batteries at a high discharge level then thermal management becomes much more important.  For instance if you are doing laps +20 on a track on a hot summer day then your batteries will NEED cooling, not to mention every other system on your car:


The coolings fins placed between the cells are essential for getting the heat out of the cells.  The fins are made from 8” wide aluminum flashing from Lowes.  It comes in 25’ long rolls that are cut into squares.  Since I don’t like making the same part more than once, I set-up a quick line to crank out a hindered in a matter of minutes using a $30 paper cutter from the office supply store.


The cutter comes with a simple fence and has no problems cutting the soft thin aluminum.

As you can see in the picture I setup the cutter and roll on a bench so I simply unroll it cut and repeat. 
For this pack I used one fin every other cell.  This assures that each cell is in direct contact with a fin and should be minimum if your application requires cooling.  Fewer fins will only cool some cells and result in potentially significant variations in cell temperatures.  For very high power and ambient temperatures you can step up to a fin in between every cell for double the cooling.  I used bare aluminum flashing for maximum heat transfer and it was the only finish I could find in 8” width.  The flashing is also available in prepainted which could provides a thin barrier which could help with voltage leakage from the pouch casing but will decrease the effectiveness of the fin some amount.  Whichever flashing you use make sure that the surface of the flashing and the cells are clean before assembly.  Any dirt or debris that becomes trapped can potentially damage the cell during assembly and/or result in wear over time.