On the DIY forum rwaudio asked if I had blocked up the other 3 corners to get the same height. I had thought about that but assumed the difference was small enough it would be in the noise: cosine of the angle, blah, blah, blah... But reading the reply one of my favorite phrases popped into my head : "One test is worth a thousand expert opinions." So I tried it with wood blocks under the other 3 corners and here are the results:
FL: 80.2+76.6=156.8kg
FR: 103.4+85.4=188.8kg
RL: 97.7+80.7=178.4kg
RR: 74.4+109.7=184.1kg
Total=708.1kg=1561lbs!
That is a 200 pound difference and means I am 25lbs under where my calcs say I should be. This is only ~10% lower then my first measurement but it makes a big difference. The blocks weren't the eaxt same height so I am going to keep with my original calcs and assuming my cheapo measurement system is 25lbs optimistic. I did do a few measurements and found it was repeatable within a couple kgs. The real answer will be when I weigh it finished but it's good to know I am on the right track (pun intended).
Saturday, April 14, 2012
Wait! Weight?!?
Well with the car down to a roller I decided to see what the weight was. Lesson learned from prototyping aircraft is to follow-up and check the weight periodically to avoid the surprise of having a 200lb useful load. :) The weight always creeps up and you have to deal with it, this car was no exception. :(
Unfortunately I never did get it to the gravel yard to weigh it before hand but the published curb weight is 2400lbs. Now that 2400lbs doesn't include any options and my donor was fully loaded with PS, AC, AM/FM/CD, leather seats with built in speakers, etc. I have been weighing all of my parts as they come off the car with a bathroom scale. I have been doing it in boxes so that the accuracy errors don't add up (errors are rarely linear). I did not weigh the engine I removed but research says it should be about 300lbs wet. I also did not weight fluids but everything else was accounted for:
3/15:
Exhaust: 36.2lbs
Spare Tire: 22lbs
Top and Frame: 34.6lbs
Top parts, rear compartment panels, rear carpet: 38.2lbs
131.2lbs removed
3/17
Radiator 17.6lb
Airfilter and Misc: 12.2lbs
Header and downpipe: 18.0lbs
PS + hoses, AC (partial), misc 24.6lbs
72.4lbs removed
Engine: 300lbs (est)
Fuel tank and hoses: 27lbs
630.6lbs removed
2400lbs - 630.6lbs = 1769.4lbs
Now how to weigh my roller? Well I could spend $1700 for a nice set of race scales that I would but under all 4 wheels but I don't have that money to blow so I went for a cheap solution. I bought 2 scales with a 440lb weight limit for $25 each (you can find them on sale for $17 sometimes).
http://www.amazon.com/gp/product/B00472I1V2/ref=oh_o01_s00_i00_details
Now based on a few tests I would say the scales are accurate to ±5lbs but that is good enough for my for the car weight. So to avoid exceeding the max weight I put a 2x6 across the 2 scales and recorded both weights. I jacked up each corner and got 4 weights, one at a time.

FL: 248.6+220.0=468.6lbs
FR: 264.2+220.0=484.2lbs
RL: 293.6+212.8=506.4lbs
RR: 286.7+222.0=508.7lbs
That puts the roller weight at: 1925.9lbs :( I am 175lbs over my estimate of where I should be today!!!
Now adding up the weights of my other parts the weight will be ~2800lbs at in street form. Well above my final target of 2204lb (1 metric ton) but I do have some more weight reduction (heater, air conditioning, stereo, lighter seats, windows.....). That 1ton goal is for a very stripped down version but all this doesn't fully add up since I know of people with ICE powered NA miatas at 1800lbs. Part of the weight increase is I have upped my pack size. I knew it will be a struggle to get that low, but that extra 175lbs will make it virtually impossible.
BTW I apologize for using the antiquated units, my scale was in lbs but from now one I will be recording in the proper units, SI.
Hopefully next week I will have my PL6 battery tester back and a motor adapter so I can make some real progress.
Not-so Adapting Adapter
I emailed Electric Car Company and told them I was returning it for a full refund and asked for a return shipping label. A few days later I received a return shipping label but no other communication from them. I mailed it out and hope to get my refund soon. BTW that adapter weighed in at 28lbs!
So I went ahead and ordered the performance adapter from rebirth auto since they said 7-10 day turn around.

Getting the charge on the charge card
A bit of an update on the project. I haven't done much on the actual build due to the adapter woes but I have spent a fair bit of money.
I ordered and received my batteries! 250 A123 cells with full tabs. I really wonder when the delivery driver looked at the shipment he had thoughts of being used as a drug mule. :)

The bad news is my PL6 died but the good news is the warranty replacement is supposed to arrive Monday. Once it arrives I will start taking data and post the results here:
I got my cable and crimper and connectors so I can start making up my cables. I was able to find a good US made bench top manual crimper, new for a decent price. Luckily for me the seller didn't do a good job of describing it on ebay and it took 30 minutes of websurfing to find out exactly what it was. http://www.uzengprod.com/ I wanted a crimper that, when used with the right terminals, would be UL listed and would have at least 3 crimp points. I did some searching and found most lug install specs require a minimum of 3 crimp points (NASA says 4 but this isn't a spacecraft :) so that eliminated all of the cheap crimpers except the the Chinese green lee hydraulic knock offs. I will gladly spend a few extra buck for an American made product.

The connectors are new Molex lugs and the cable is very good 2/0 bright orange cable (safety requirement for first responders) that I ordered from Trystar. I like to buy in bulk and so I have enough to do 4 or 5 cars. I am thinking about offering to make cables for whom ever doesn't want to go out and buy a good crimper and do it themselves. When I did the Leadwing I used a battery cable company but they were pricey for cables over a few feet.
Thursday, April 5, 2012
Motor Dry Fit!
Well I am still in discussions with Electric Car Company about my adapter. I just heard from Steve at Rebirth that a adapter from them will be a 7-10 day lead time. Lesson learned...
So yesterday I pressure washed the 178,000 miles off grease of the car so when I work on it I don't look like a coal miner. :)

And tonight I deiced to go ahead and dry fit the motor without the hub. I first needed to layout the motor cradle so I found a short section of heavy wall 1.25" pipe that had a nice tight fit over the input shaft. This allowed me to measure the height and see that the cradle fit really well if I welded it to the sub-frame.

 The cradle is the same style I used on the leadwing. It's actually a mount for large high pressure cylinders (9" OD) in military ships. It even comes with a warranty plate circa 1988. Either way it is very stout, comes with all the hardware, and was $30 for two of them shipped! :)
It will need some modification but for now I just tacked it into place to dry fit the motor.

I am glad that I went with the 9" motor as once I put on the adapter on the assembly weighed over 210lbs! This really wasn't bad to lift, carry and man-handle into place, but if I had a 11" (~350lbs) I would have definitely need a hoist.


You can also see the the great space in front of the motor for one of the pack modules (with the help of my assistant). I was originally planning on splitting the pack into 2 modules but it would be a little too long. So I am going to do 3 instead to fit between the the frame rails.

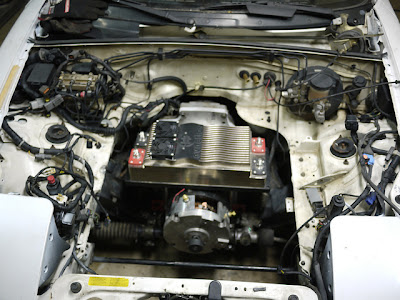
 I also test fit the controller. That Soliton1 is such a great piece of eye candy that I couldn't tuck it off into a corner. So just like on the leadwing I am going to put it front and center. I am considering 2 options: This first is mounting it parallel to the motor. Looks nice and would be fairly easy to mount.

The other option is to put in perpendicular. I am planning on putting in a strut tower brace so it would be REALLY easy to mount the controller and it hides the wiring by pointing toward the firewall. But it doesn't look right.... I'll do some more head scratching but I am leaning towards putting it in long way. I think if I did it sideways it would be a detail that would bug me.
Of course every knows that blowing bubbles on your controller is good luck for an EV....

So yesterday I pressure washed the 178,000 miles off grease of the car so when I work on it I don't look like a coal miner. :)

And tonight I deiced to go ahead and dry fit the motor without the hub. I first needed to layout the motor cradle so I found a short section of heavy wall 1.25" pipe that had a nice tight fit over the input shaft. This allowed me to measure the height and see that the cradle fit really well if I welded it to the sub-frame.

 The cradle is the same style I used on the leadwing. It's actually a mount for large high pressure cylinders (9" OD) in military ships. It even comes with a warranty plate circa 1988. Either way it is very stout, comes with all the hardware, and was $30 for two of them shipped! :)
It will need some modification but for now I just tacked it into place to dry fit the motor.

I am glad that I went with the 9" motor as once I put on the adapter on the assembly weighed over 210lbs! This really wasn't bad to lift, carry and man-handle into place, but if I had a 11" (~350lbs) I would have definitely need a hoist.

Anyway the motor fits in really well. I am going to trim the cradle away some before I weld it all in as I think I can lower it about another 1" to give a little better CG. Seems excessive but this is the heaviest single item on the car.


 I also test fit the controller. That Soliton1 is such a great piece of eye candy that I couldn't tuck it off into a corner. So just like on the leadwing I am going to put it front and center. I am considering 2 options: This first is mounting it parallel to the motor. Looks nice and would be fairly easy to mount.
And a 4 year old in thedriver's seat making motor noises makes it even better :)
I might even put it in a bit of an angle just to show it off more and get a little more clearance in the front for the pack.

The other option is to put in perpendicular. I am planning on putting in a strut tower brace so it would be REALLY easy to mount the controller and it hides the wiring by pointing toward the firewall. But it doesn't look right.... I'll do some more head scratching but I am leaning towards putting it in long way. I think if I did it sideways it would be a detail that would bug me.

Of course every knows that blowing bubbles on your controller is good luck for an EV....

If only the adapter was correct I would be really close to hooking up a few SLAs and driving arounf the driveway....
Monday, April 2, 2012
One step forward, one step back
The long awaited adapter and hub arrived today and for the most part it seems good except for a couple of issues which I will go into more later. I started by nailing a couple pieces of wood to my workbench to cradle the motor. The last thing I wanted was a 180lb chunk of metal to roll of the workbench on to my toes!

The adapter plate
 The adapter is made of 3 pieces of aluminum plate that apparently have been water-jet cut. They are attached to the motor with 4 bolts that were included along with 8 flat washers (presumably to keep the bolt from shanking out) and 4 split washers. I normally don’t see plate this thick water-jetted because of the kerf from the jet fanning out. It is okay as long as you account for it by giving plenty of clearance to adjacent parts. I am not crazy about it for the mounting bolts but this plate is so thick it shouldn’t be a factor.
The first really issue is the hole in the plates for the hub is just barely oversized and the tolerance of the plate means it’s not quite centered on the shaft. Because there was so small of a gap designed between the hub and plate, this just bearly causes an interference. There is no play in the bolts mounting the plates to the hub so the hole in the plates must be opened up or the hub turned down (I think the best answer is both).
This really could have been avoided by making center hole ID (Inside Diameter) much bigger. All of that aluminum inside the 4 motor mounting holes is not doing any good. It doesn’t carry any load and is just dead weight that should have been just put into the recycle bin for the machine shop to get a few bucks back.

One last note on those split washers. In this application they are useless because you have to use the flat washers underneath them. Split washers only *work* when they make contact between the base part and the fastener. I will be using Loctite to keep these in place.
The hub

The design of the hub is… interesting. It looks like part of a cast shaft coupling that screwed into the actual hub by 3 M10? socket head cap screws. These screws alone would not be sufficient to carry the repeated +200ft-lbs torque of the 9” motor but since the coupling appears to be wedged in (kind of like a taper lock) when you clamp it up it should be strong enough. The hub is also larger in OD (Outside Diameter) then it needs to be which like the ID of the adapter is un-necessary weight and leads to the interference above but also causes a interference with the flywheel. The flywheel has a recess that would normally go around the end of the crankshaft. The hub is considerably larger OD then the original crank so it does not fit inside.
I am going to email Electric Car Company and we’ll see what they say. I am sure they will fix the issues but it's a matter of how long it will take. I have a feeling I may be borrowing some lathe time soon to turn down the hub OD and opening up the plate IDs myself just to make it happen faster.
One other issue is I don’t have bolts for the flywheel. :-( This is 100% my fault because I should have resused the ones from the engine. But I left the old clutch and flywheel on for the guy who bought the engine as he was converting from auto to manual. Oops.
Sunday, April 1, 2012
Armstrong power steering
Tiny update today. I did a power steering delete tonight. For cars this light power steering is really not needed. It will take a little effort in parking lots but it's really not needed. This saves me the weight , energy and and it's really easy. I have done this before on a 1987 BMW 325 track car I had for the 24 hours of Lemons, but that is another story...
Anyway there are several ways to do this:
#1: - Install a non-powered rack.
This gives it a factory manual ratio but you have to find a rack (which is not easy given the popularity of spec miata racing) and has a slower rate that helps in the parking lots but not so much on the twisties.
#2 - Depower the rack.
This is keeping your original rack and modifying it to operate manually. And there are two ways to do this the hard way and a really easy way.
#2a - Sealectomy
Which is to pull the rack apart and remove the internal seals and reassemble it:
http://www.flyinmiata.com/tech/depower.php
While it is the *best* way, I think it is overkill.
#2b - Plug and loop (what I did)
Here you start by plugging the ports from the power steering lines. If you just did this the steering would be very stiff because you are having to pump the fluid back and forth. To solve this, you cut the lines small lines that go from the valve to the rack and the turn the steering lock to lock to blow out the extra fluid. This will not remove all of the fluid so it will still lubricate the rack and pinion gears. To keep dirt, water, condensation, bugs, etc from getting it you put two short pieces of hose between so when you steer you just move air from one side of the rack to the other.

I actually reused some of the fuel hose I removed with the fuel tank. I know people that have done this to their miata's and 7 years later they are still going strong.
In the end it cost me $0 and took 15 minutes.
Simplify and add lightness. :)
Anyway there are several ways to do this:
#1: - Install a non-powered rack.
This gives it a factory manual ratio but you have to find a rack (which is not easy given the popularity of spec miata racing) and has a slower rate that helps in the parking lots but not so much on the twisties.
#2 - Depower the rack.
This is keeping your original rack and modifying it to operate manually. And there are two ways to do this the hard way and a really easy way.
#2a - Sealectomy
Which is to pull the rack apart and remove the internal seals and reassemble it:
http://www.flyinmiata.com/tech/depower.php
While it is the *best* way, I think it is overkill.
#2b - Plug and loop (what I did)
Here you start by plugging the ports from the power steering lines. If you just did this the steering would be very stiff because you are having to pump the fluid back and forth. To solve this, you cut the lines small lines that go from the valve to the rack and the turn the steering lock to lock to blow out the extra fluid. This will not remove all of the fluid so it will still lubricate the rack and pinion gears. To keep dirt, water, condensation, bugs, etc from getting it you put two short pieces of hose between so when you steer you just move air from one side of the rack to the other.

In the end it cost me $0 and took 15 minutes.
Simplify and add lightness. :)
Subscribe to:
Posts (Atom)